
Scott Little
Door

The straps wrap around the hinge side of the door and are forge welded into a loop which protrudes on the interior side of the door. This loop fits over a round pin mounted to the door jamb to form the hinge. The round pin was formed by forge welding three 1/2" diameter rods together which were then spread and flared to create the attachment to the door jamb. Note the forged washers on the inside of each rivet. The door had to be assembled on the anvil. Each rivet was driven into place, the washer positioned, and the rivet headed cold with the other head resting on the anvil. The resulting clamping forces are enormous.

This photo of the lower hinge shows how the straps wrap around the hinge side of the door and are mortised flush with the edge.

Here's the inside of the Norfolk latch mechanism. The extra little piece (top) is a simple lock that I devised. Note the square-headed bolts. I made them by forging the hex heads of regular lag screws square.

Here's a closeup of the handle on the outside. It's a big heavy handle. The escutcheon plate is 21" long.

Finally, here's the key that I made to open the simple lock mechanism mentioned above.
Trivet

This trivet was inspired by some of the many techniques I learned in Bill Bastas' blacksmithing class at ACC. It's made of three pieces of 3/8" dia round stock. I formed the leaf first, then the tenon, and then I split and drifted the mortise. After considerable experimentation with the curves, I fitted the three pieces together and headed each tenon by holding its rod securely in the vise and heating the protruding tenon with a torch. It's about 8" in diameter.

This trivet was made by forge welding three RR spikes together and working over the joint rather thoroughly. I've spent a lot of time trying to master forge welding because it seems like such an integral part of "real" blacksmithing. As you can see, I can do it...but it's still a highly uncertain process for me.
Forge Madness
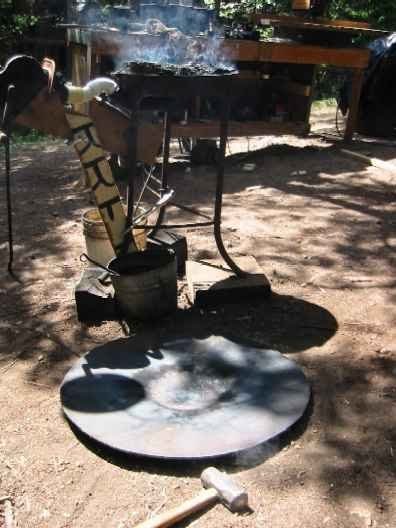
A while back I decided to make a new forge. I love my little rivet forge but there's a limit to the size of fire that can be built in it and its fire is destined to be rather shallow, a problem for the aspiring forge welder. The first step was to purchase a nice firepot. I settled on the heavy duty coke firepot offered by Centaur forge. It is a thick casting! Wishing to retain some of the character of the rivet forge, I decided to make a circular pan for the firepot. I also wanted to end up with a flat area around the periphery so I could more easily lay tongs, workpieces, etc. beside the fire. Being an amateur blacksmith, I decided to make this pan myself using my existing equipment. How naive I was! First I torch cut a disc of 1/4" thick mild steel about 30" in diameter. Then I temporarily relocated the blower on my rivet forge (see photo) so that I could lay this big disc flat on the forge and get it centered. (note the PVC pipe sections to extend the airpath). My procedure was to heat the center of the disc until it was red hot and then throw it on the ground and beat the center of it with a 4lb hammer until I was exhausted. What you see in the photo is the state of the disc after three heats. Once the depression got fairly large, my rivet forge could no longer get the whole area red hot at once. I started heating a spot on the edge of the depression and banging it down, then moving to the next spot, etc. etc. Finally I had the good sense to torch cut the center hole in the plate. That relieved things considerably and I was able to form the lip properly in only about ten more heats....(whew)!

Then the fun really started. As you can see in this photo of the finished pan, I decided to form two troughs so I could get the middle of a long bar closer to the fire. Without going into a lot of whining and moaning, let me just say that these troughs were harder to form than the big depression in the center! (NOTE: please read the May 2004 update at the end of this article)

After the basic shape was completed, the periphery was far from satisfactorily flat. Unfortunately the necessary corrections extended over large areas of the surface and I had no way to heat such large areas to forging temperature. So I proceeded to flatten the rim of the pan cold. At one point I had it lying on the dirt and was hitting various spots around the rim with a 16 lb sledge....just to get the shape to change at all. Slowly, over the course of several frustrating sessions, I started to understand how to change the shape of the rim and now it's pretty flat. September 8th, 2001:

It's finally quit raining long enough for me to get some more work done on the new forge in my outdoor shop. The air pipe you see in this photo was quite a project. I took 3" pipe (3.5" OD) and welded it to a torch-cut flange to mate with the Centaur Forge firepot. Then I miter-cut the pipe and welded it back together to get it to come upwards at a 50º angle...to match the flange on the blower. But the blower outlet was only 2.5" diameter so I cut a long triangular sliver out of the pipe, forged the remaining part of the pipe down until the gap closed, and TIG welded the seam, effectively producing a tapered section.

Here you can see the slight taper in the upward slanting section of the air pipe. The next step is to complete the stand and this baby'll be ready to light up. 15SEP01 - It is finished!

Well, here it is in completed form with a fire going in it. I made the stand out of some 1" iron pipe I found at AMP (metal recycling center on Howard Lane in north Austin). It blows a lot harder than my old rivet forge and, so far, I think I like the coke firepot's "clinker breaker" feature, which allows me to restore the fire pretty thoroughly while it's burning. NOTE: the wooden blocks under the legs are required because my entire outdoor blacksmith shop is
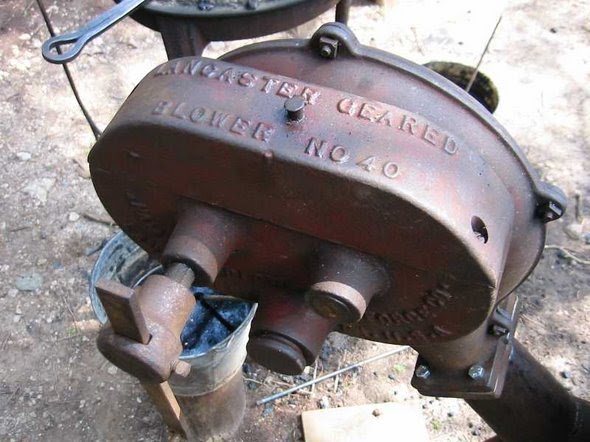
Here's a closeup of the big "Lancaster" blower on the new forge. I would like to do some rework on this blower but I can't figure out how to disassemble the high-speed shaft.

OK, thanks to the advice of Rick Morningstar of Oak and Iron Forge, I've managed to get this thing mostly apart....and the balls and races are really in nearly perfect condition. I think it'll sound a lot better when I get it all cleaned up and properly adjusted and lubricated....but I still need to get the mid-speed shaft out of the housing!....any ideas?
(note that this blower is, in fact, a Champion blower made in LANCASTER, Pa.)
UPDATE: May 2004
After using this forge for a while for various projects, I have come to the dismaying conclusion that all the forming I did on the 1/4" plate was a waste of time. With the added depression in the 1/4" plate, the firepot is now TOO deep. So if you make your own forge using a factory-made firepot, just attach the firepot to the bottom of a FLAT sheet of steel. Then way out away from the firepot, you can/should fashion some low walls to retain your coal. Make sure to leave two opposing places on either side of the firepot where there are no retaining walls....so you can lay a long piece of stock down atop the firepot and get it close enough to the fire.
Thanks....Scott
My School Grill
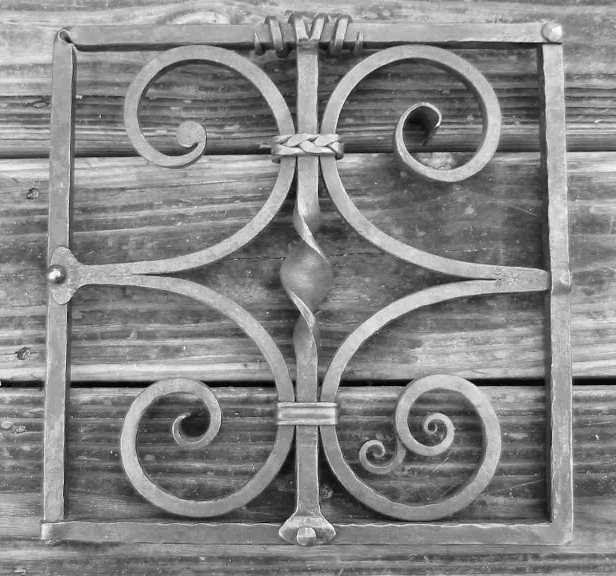
Below is my "school grill", the class project I made recently in Bill Bastas' metalsmithing class at ACC. The grill is 12" square and deliberately employs different kinds of corners, scrolls, joints, etc. to give the student an opportunity to learn a variety of smithing techniques. I had a blast making this grill and even came up with a few "original" ideas of my own such as the center detail (a spread twist), the braided collar, and the split scroll in the lower right corner. To anybody who hasn't already taken Bill's class, I HIGHLY recommend it!
The Framed "C"
This "framed C" was inspired by the Bastas School Grill (thanks, William).

This grill is 11" square. All the stock is 1/2" square heavily worked over all surfaces. The pineapple (diamond) twist was made with 10/4's initial twist followed by 5/4's reverse twist. Final adjustments were made by locally heating the twist with a torch and twistin' and untwistin' until the diamonds lined up satisfactorily. The leaf rivet and "wiggly" rivet were made as follows. First I upset a small area in 1/4" rod about 2" from one end. Then with that area very hot, I dropped the rod into a special swage block I made and drove it down into the swage cavity with a "monkey tool". This formed the upset area into the little trumpet bell shape (most visible on the lower "wiggly" rivet). The small leaf at the end of the upper rivet was just made out of the 1/4" rivet stock...i.e. that rivet is one piece. After fabrication, I brushed the entire piece vigorously with a very coarse wire brush, heated the entire piece moderately (i.e. 300 degrees F or so) and wiped on Danish oil (natural color). This stuff polymerizes so it leaves you with a thin permanent coating that is fine for indoor usage. The elevated temperature just seems to help the oil penetrate everywhere and maybe even darkens it a little.
Handrail

My main interest in blacksmithing is functional ironwork. I made this door at our house completely from scratch using 3 planks of roughsawn longleaf pine 1-3/4" thick by 13" wide (from an old school building in San Antonio). The door is held together entirely by the two heavy (2" x 3/8") strap hinges with a pair of 1/2" diameter rivets through each plank at each strap. Yes, the design is painfully simple. At the time this was by far the biggest blacksmithing project I'd ever undertaken and I was totally focused on function.

I made this handrail out of a piece of old-fashioned re-bar scavenged from the debris piles below Tom Miller dam in Austin. The piles (the biggest of which is known as Red Bud Island) are the remains of the old earth and masonry dam (which failed catastrophically in 1900) that predates the present concrete dam. This piece is 3/4" square bar uniformly twisted along its length. That's how they made re-bar grip concrete in the old days. It was horribly bent when I found it and I only straightened it enough to make a functional railing. I slit and drifted 1/2" holes for the stanchions using a special little rounded punching "anvil" I made so as to protect the existing twist. The stanchions were made of 7/8" diameter round bar that I tenoned on one end and split in half on the other end for the mounting feet. The stanchions are secured to the studs in the wall with 1/4" lag screws whose heads have been forged square for a more authentic look.